Showing posts with label DIY. Show all posts

Saturday, November 16, 2013

Tortellini Soup - A Secret Weapon Recipe!

It's been soooo cold and miserable here in Louisville already. We've even had bits of snow??? OMG. This is supposed to be such a long and harsh winter and it's got us already craving some fab comfort foods. 

This recipe for Tortellini Soup is one of my family's favorites! It's nourishing and delicious and a super easy and inexpensive way to feed a crowd!! It's also sneakily high vegetable and low fat. 


Ingredients:

* 3 cans of chicken broth
* 2 cans of diced tomatoes with basil, garlic and oregano
* 1 can Rotel
* 1 small pack Buitoni refrigerated tortellini
* 1 small can white chicken, drained (optional)


Cans, cans, cans.
Lots of soup labels for the collection box at school! 


Easy cooking:

Put chicken broth, diced tomatoes and Rotel in soup pot. Bring to a boil. Add tortellini and cook according to package directions, until tender. If adding chicken, put the drained chicken in and let it heat for a few minutes. Serve and enjoy!! 


The tortellini will float on top. I kind of scoop up tomatoes to dump on top to keep the pasta submerged a bit while it's cooking.

We always serve it with warm crusty garlic bread!


Modifications:

* The recipe can be multiplied, based on how much you want to make and how big your soup pot is! ;) I usually double it so that we have leftovers to reheat for a few days. A double batch works well with one large (20 oz) package of Buitoni. 

* I usually keep an extra can of chicken broth to add to the leftovers if it's not liquid/soupy enough.

* We like our food kicked up a notch - or twenty! - so I usually use the "hot" Rotel instead of the original.


And that's it! 

Hope you enjoy!! :D


Tuesday, October 15, 2013

Nails of the week: Lucky Mag November Manicure

It's been a while since I did a nails of the week post. I promise I've kept them done, just been busy with other things! ;)

I was flipping through my new Lucky magazine yesterday and saw this mani idea. I have polishes basically just like the ones they used, so I thought it would be fun to try! 


The article used Deborah Lippmann polish in Stronger over Essie polish in Power Clutch. I used Deborah Lippmann polish in Ray of Light over Julep polish in Daria. I used my trusty China Glaze base coat and, of course, a top coat of out the door! I couldn't get 'out the door' without it! LOL! 


They turned out... okay. I think my Lippmann polish has a base that's a tad too dark, even one coat almost completely covered the grey. 

With flash inside

In shady natural light

In full natural light

What do you think? Are you in full fall mode, dark nails and all? I'm definitely starting to get into it, even though our days have still been warm here in Louisville! :D


Monday, September 9, 2013

Yes, you CAN Make Quiche!! Recipe time! :D

Don't forget to enter my Social Monograms giveaway to win a personalized leather clutch while you're here!! 


Looks like someone was nibbling while this one was cooling... sorry!! ;)

Once upon a time, long long ago, I thought quiche was something no mortal (read: pretty basic) cook could make. At some point I stumbled upon a recipe that was doable and, with some tweaks over the years, it has turned out pretty great! This is something that always impresses people - you made QUICHE?!?! - and is something that even the kiddos will eat (sort of! haha). 

I have several variations of this recipe that we've used at different times. This is the basic one the even the veggie fans will love! 


Ingredients:

Two 9" deep dish frozen pie shells (thawed)
5 eggs*
1 1/2 cups heaving whipping cream or half and half**
1 red bell pepper, diced
1 green bell pepper, diced
1 cup herb seasoned stuffing mix, crushed up
1 cup grated Swiss cheese 
1 cup grated Monterey Jack cheese
1/2 tsp onion powder***
1/2 tsp salt***
1/4 tsp pepper***


Prep Instructions:

Preheat oven to 350.

Combine the eggs and cream in a bowl. Whisk/beat with electric mixer until uniform in color. Pour into pitcher if your mixing bowl is difficult to neatly pour from.

Spread the red and green peppers in the bottoms of the pie shells. 

Sprinkle the stuffing mix over the peppers.

Spread the cheeses over the stuffing mix.

Sprinkle the onion powder, salt and pepper over the cheese. 

Place the quiches on a drip pan to catch any messes. Give the egg/cream mixture a good whip and pour until shells are about halfway full. Open oven, pull out rack, set on rack and finish filling pie pans, stopping about 1/4" short of the rim.

Bake at 350 for 50-60 minutes, until the top is nicely browned and a knife comes out clean in center. Let cool 15-30 minutes before slicing (I never can wait that long! LOL!).


nom nom nom!!! 

I am always happy that we have two full quiches since I think this just gets better reheated as leftovers! Let me know if you try it and how it goes! 


Bonus tip: kids will eat just about anything if you promise them S'mores afterwards!! LOL! 


*, **  through experimenting, I have found a lower fat way of making this that I use now. Instead of 5 eggs and 1 1/2 cups whipping cream or half and half, I use: 6 eggs, 1 egg white, 2 cups of fat free half and half. I think it tastes just as good and takes a TON of the extra fat out. This is how I always make it for us! :)

*** I personally like things kicked up a notch (or five) with the spices and I usually double all three of the spices if it's for the adults. The kiddos prefer the original version.


Tuesday, August 20, 2013

Celeb Style DIY: Olivia Palermo + ASOS

Time again to breakdown a celebrity look and see how to recreate it at real world prices! Loves it!! 

This Celeb Style DIY features Olivia Palermo and... well... honestly, I'm not a fan, but even I have to admit that the girl has some great fashion moments! I think I need to practice walking around with a bitchy look on my face... maybe then people will take my fashion more seriously! Hahahaha!! 


Here's today's look:


The crazy thing about this is how affordable this actual dress is! The accessories? Um... not so much! The bag alone retails for $4,850... Yep. Almost $5k. It's from the Sofia Coppola Louis Vuitton collection and can be gawked at here


So now the version that everyone can enjoy! Yay! :)


ASOS Skater Dress, $67.50. Her exact dress! Sign up for ASOS email to get $10 off first order!
Mossimo Gold Snake Flats, $12.99
Xhilaration Sunglasses, $12.99
Mossimo Supply Co. Stud Skinny Belt, $14.99
MG Collection Penelope Handbag, $29.99
Cutout Petal Cuff, $6.80


Cute, right?? Another great summer to fall look with pieces that would look great even through the winter (add tights and boots!). And all for about $145! Not bad! 


Wednesday, July 3, 2013

DIY: Kool-Aid hair color!

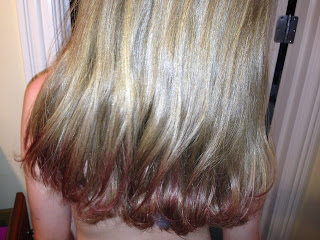
The girls go to private school and have to dress pretty conservatively, so in the summer they LOVE the chance to cut loose a little with their appearances! One of their favorite summer traditions is dying their hair tips with Kool-Aid! I feel better about it than regular hair dye and it pretty much washes out over a month or two, especially with time spent in the pool. And if it's NOT all gone, we only dye the last few inches that will need to be trimmed before school starts anyway! It's so cute and fun and I thought we'd share how easy it is with you!! 

1. Buy packs of Kool-aid at the grocery store. You need three packs of the same flavor per color. Just about any color is going to show up great on blonde hair, brown hair needs a darker color like red or purple. Each color needs its own small plastic bowl.


2. Put hair in a ponytail at base of neck then a second ponytail holder to mark the point that you don't want the dye to pass. My girls think this hairstyle looks like Jasmine! ;)

3. Dump the Kool-Aid into the bowl and fill the bowl about halfway full of warm/hot water. It will be THICK, so give it a couple stirs to dissolve the Kool-Aid. Then microwave the bowl for about a minute to get it really good and hot. 

4. Dunk just the part you want dyed into the bowl and let it sit for 10 minutes. I kind of swish it around every once in a while to make sure the color gets all the way through the hair. We can't do this step without making a MESS so we usually do this on the floor/seat of my walk-in shower with the girls in minimal clothes! LOL!


5. Leave ponytail holders in and rinse the hair with cold water

6. Leave ponytail holders in and dry with a hair dryer. I take it down when it's still a little damp and then finish drying completely to make sure it doesn't get on any clothes, etc. 

Purple is kinda subtle on brown, but so pretty! 

Wild and crazy for Pep! LOL!


7. That's it! Enjoy! Happy summer!!

Saturday, June 22, 2013

DIY Boutique Elastic Hair Ties!


After buying these for close to $2 each in California last month, and LOVING them but realizing how quickly they get stretched out, I searched out info and figured out how to make our own for about a quarter each! And it's SO easy the 7 and 9 year olds were cranking them out in a snap! You can make them, too!!

You'll need: Scissors, a ruler, a lighter and 5/8" fold over elastic in your choice of print or solid. You can buy this elastic at most fabric or craft stores. I bought ours from poshnpretty.com. I'm happy with my elastic, but there is a pretty broad range of thickness/stretchiness in the ones we chose and you would obviously get a better feel for each piece if you bought them in person. We got all kinds of colors and prints on this site, ranging in price from $.40 to $.99 per yard.


Here's the steps:

1. Pick your elastic. Measure and cut the length that you need (9" for a hair tie, 20" for a headband)


How cute is this chevron??


2. Fold the cut piece in half, with the shiny or patterned side out


3. Keeping the pieces as flat and smooth as possible, tie a knot in the middle and work the knot towards the end as you tighten it, leaving tails of fabric hanging out. Ends will be frazzled looking!


4. Use a lighter to seal the ends. Don't actually touch the flame to the elastic!! The elastic will stay super hot for several seconds. (no picture of this, couldn't figure out how to do it all at once or how to ask a kid to either hold the lighter or a camera close to a lighter! LOL!)

5. That's it! We made 6 headbands and 49 hair ties in about 45 minutes for a total cost of about $17! Awesome!!


6. Enjoy!!


Tuesday, June 11, 2013

Exercising at home! Get your sweat on!!

Ah.... at home exercise. All the benefits without having to drive to the gym and sweat with/in front of strangers. But the main problem remains, if you don't like it, you aren't going to do it. Or maybe that's just me? LOL! I definitely need a workout to either be fun (doesn't feel like exercise) or simple enough that I can multitask (iPad on the elliptical).

I was a Reebok step aerobics fanatic back in the day. Anyone else? My knees have always been an issue, so that was probably not the best choice, but I definitely thought it was fun! I never had a nice step box, though, I had a super slippery plastic cube thing that added that extra element of challenge and danger! The fact that I can't find a picture of one anywhere tells me that they probably led to lots of injuries and lawsuits! Haha!


This outfit... OMG.
I thought this guy was hilarious back in the day, and now, even more so! LOL!
Not sure why he came up on my search, but he made me laugh!

 
I also was all about some Billy Blanks Tae Bo for a LONG time. I've always loved Billy. He always seems so POSITIVE and encouraging and nice. Like we'd be friends in real life. He's like, "It's okay, just do your best!" I definitely don't want my DVDs yelling at me and being mean to me like the hubby's P90X, etc., who are more like "THAT'S SO WEAK YOU LOSER!! DO 50 MORE PUSH UPS!!" Okay, maybe not EXACTLY like that, but definitely not my style!


So nice! Thumbs up! You can do it!! 
He's definitely always been good for some questionable outfits! LOL!

When Billy put out Boot Camp, I got into that, too. It did a lot with the resistance bands, though, and I could feel my arms bulking up some, so I ditched the bands and did it just for cardio. But he still seemed SO nice, like "Hey, it took you 9 months to put on the baby weight, give yourself at least 9 months to take it off! You got this, Mama!" 


Um.... Pretty close to a wardrobe malfunction, Billy! LOL!

This outfit.... It.... Matches?? Haha

Not too long ago I went through a major phase with this goofy 10 minute Hip Hop DVD, too. I picked it up at Target on a whim and it was actually really fun! 


Idk what this is that came up in my search, but I'm feeling like anything this teacher could do, I could do! LOL!


Ok, ok, let's skip to the present a little bit. There are a few programs I've been loving recently. The one that my family gets the most LOLz out of is Shaun T's Rockin' Body. I bought this one on a Groupon deal and it's seriously fun. For real. And goofy as all get out. You can't have any shame and do this one in front of ANYBODY! Haha!! It's been interesting for the hubs to see this side of Shaun T. The dude is a famous choreographer, so this is definitely more his natural personality I would think, but it's a whole different side than the super tough guy in the Insanity videos!!


Mystical....

It's a dance party!

Not sure why it turned up in the search, but how cute is this??


I also rotate in some Brooklyn Decker yoga every once in a while.


I wish I could do yoga on a NYC rooftop every day!


So what do you love? What have you loved in the past? One thing I could never get into was pilates, I definitely need to be more active than that! Have you tried something lately that is new and exciting?? Do share!!